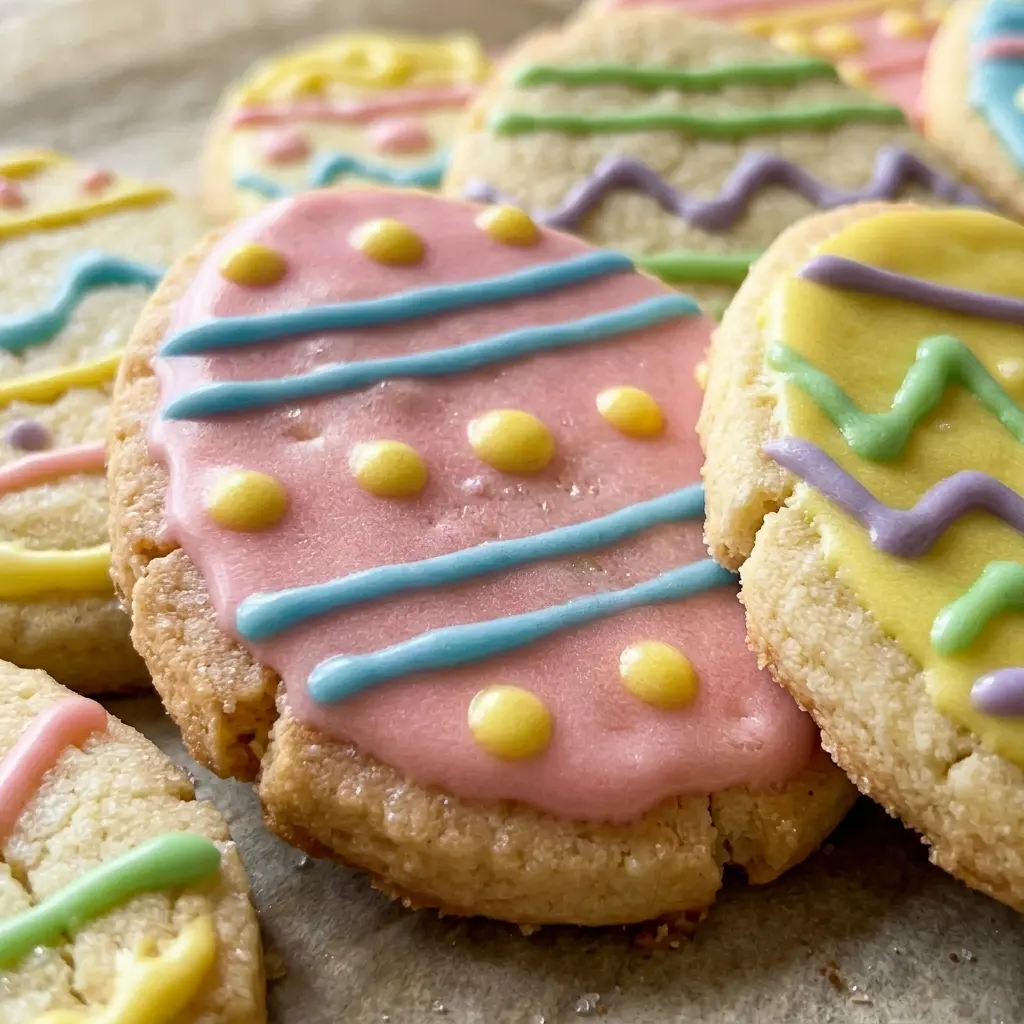
Easter is a time of joy, renewal, and, of course, delicious treats! As the spring season blossoms, there’s no better way to celebrate than by baking a batch of vibrant and playful Easter Egg Cookies. These colorful cookies not only add a cheerful touch to your Easter festivities, but they’re also a fun activity to share with family and friends.
Easter Egg Cookies are a beloved tradition that bring a touch of whimsy and delight to any holiday celebration. From their vibrant hues to their egg-cellent shapes, these cookies are the perfect way to add a personal touch to your Easter table. Whether you’re hosting a family gathering or simply want to indulge in some festive baking, these Easter Egg Cookies are sure to be a hit.
Table of Contents
Ingredients for Easter Egg Cookies
- 1 pouch (17.5 oz) Betty Crocker™ Sugar Cookie Mix
- 1/2 cup butter, softened
- 3 tablespoons Gold Medal™ All Purpose Flour
- 1 egg
- Betty Crocker™ Neon Gel Food Colors
These simple ingredients come together to create the perfect canvas for your Easter-inspired creations. The sugar cookie mix provides a delicious base, while the butter and flour help to achieve the ideal texture. The egg binds the dough, and the vibrant gel food colors allow you to customize each cookie with your desired hues.
Step-by-Step Instructions for Making Easter Egg Cookies
Preheat your oven to 350°F (175°C) and prepare your baking sheets. Now, let’s dive into the step-by-step process of bringing these Easter Egg Cookies to life!
In a large bowl, combine the sugar cookie mix, softened butter, flour, and egg. Mix until a cohesive dough forms.
Divide the dough into portions and color each one with your desired gel food colors. Knead the dough gently to ensure the colors are evenly distributed.
Shape the dyed dough into egg shapes and place them on the ungreased baking sheets, leaving a bit of space between each cookie.
Bake the cookies for 8–10 minutes or until the edges are lightly golden. Keep a close eye on them to prevent over-baking.
Once baked, allow the cookies to cool on the baking sheets for 2 minutes before transferring them to wire racks to cool completely.
The key to achieving the perfect Easter Egg Cookies is to work with the dough gently and be mindful of the baking time. With a little creativity and attention to detail, you’ll end up with a batch of beautifully vibrant and delightful treats.
Tips for Perfect Easter Egg Cookies
To ensure your Easter Egg Cookies turn out absolutely egg-cellent, here are a few tips to keep in mind:
Texture Perfection: The secret to the best cookie texture is to not overmix the dough. Gently incorporate the ingredients until they just come together, avoiding excessive kneading or mixing.
Coloring Creativity: Feel free to experiment with different food gel colors to create a wide range of Easter-inspired hues. Pastel shades, neon brights, and even marbled effects can all add to the festive appeal.
Common Mistakes to Avoid: Be mindful not to overbake the cookies, as they can quickly go from perfectly soft to hard and crisp. Additionally, make sure to let the cookies cool completely before handling or decorating them to prevent crumbling.
Flavor Variations: While the classic sugar cookie base is delightful, you can also try adding a touch of lemon or almond extract to the dough for a different flavor profile. Get creative and find your favorite Easter Egg Cookie recipe!
Creative Decorating Ideas for Easter Egg Cookies
The fun doesn’t stop at just baking the cookies – the decorating is where you can really let your creativity shine! Here are some ideas to make your Easter Egg Cookies truly stand out:
Royal Icing and Sprinkles: Use royal icing to add decorative details, such as polka dots, stripes, or intricate designs. Top them off with colorful sprinkles, sanding sugar, or edible glitter for a dazzling finish.
Themed Decorations: Embrace the Easter spirit by decorating your cookies with tiny candy eggs, fondant bunnies, or even edible grass to create a whimsical, holiday-inspired look.
Edible Embellishments: For a natural touch, consider using edible flowers, coconut flakes, or even crushed graham crackers to add texture and visual interest to your Easter Egg Cookies.
Personalized Touches: Get creative and personalize your cookies by piping names, initials, or fun Easter messages using royal icing. This makes them even more special and thoughtful.
The possibilities are endless when it comes to decorating your Easter Egg Cookies. Have fun, get creative, and let your inner artist shine through!
More Related Recipes You Might Enjoy
- Easter Birds Nest Cookies
- Cake Mix Chocolate Chip Santa Cookies
- Winter Wonderland Chocolate Chip Cookies
- Peppermint Chocolate Roll Cookies
Frequently Asked Questions
What ingredients are required to make Easter Egg Cookies?
To make Easter Egg Cookies, you’ll need a sugar cookie mix, softened butter, all-purpose flour, an egg, and neon gel food colors. These simple ingredients come together to create the perfect base for your vibrant and festive Easter treats.
How do you shape and decorate Easter Egg Cookies?
To shape the Easter Egg Cookies, you’ll divide the dough into portions and color each one with your desired gel food colors. Then, you’ll gently shape the dyed dough into egg shapes and place them on baking sheets. Once baked and cooled, you can decorate the cookies with royal icing, sprinkles, edible decorations, and more to add a personal touch.
Can Easter Egg Cookies be made ahead of time and stored?
Yes, Easter Egg Cookies can be made in advance and stored for later enjoyment. Once the cookies are completely cooled, you can store them in an airtight container at room temperature for up to 5 days. If you’d like to freeze the cookies, place them in a single layer on a baking sheet and freeze until firm, then transfer them to an airtight container or freezer bag and freeze for up to 3 months.
Are there variations of Easter Egg Cookies for different flavors or dietary needs?
Absolutely! While the classic sugar cookie base is delightful, you can experiment with different flavors by adding a touch of lemon or almond extract to the dough. For dietary needs, you can explore options like gluten-free or vegan cookie recipes to accommodate various preferences. The key is to have fun and get creative with your Easter Egg Cookie creations!
Embrace the joy of Easter and bake up a batch of these vibrant and festive Easter Egg Cookies. Whether you’re hosting a family gathering or simply want to indulge in some springtime sweetness, these cookies are sure to bring a smile to everyone’s face. Happy baking, and have a wonderful Easter celebration!
Looking for more tasty ideas? Visit Elena’s Fast & Flavorful Recipes on Pinterest for a treasure trove of easy meals, comforting bakes, and fun kitchen inspiration!
PrintCreate Festive Easter Egg Cookies for Your Holiday Celebration!

Easter is a time of joy, renewal, and, of course, delicious treats! As the spring season blossoms, there’s no better way to celebrate than by baking a batch of vibrant and playful Easter Egg Cookies. These colorful cookies not only add a cheerful touch to your Easter festivities, but they’re also a fun activity to share with family and friends.
- Prep Time: 15 minutes
- Cook Time: 10 minutes
- Total Time: 25 minutes
- Yield: 24 cookies 1x
- Category: Dessert
- Method: Baking
- Cuisine: American
- Diet: Vegetarian
Ingredients
- 1 pouch (17.5 ounce) sugar cookie mix
- 1/2 cup butter, softened
- 3 tablespoon all-purpose flour
- 1 egg
- neon gel food colors
Instructions
1. Preheat your oven to 350°F and prepare your baking sheets.
2. In a large bowl, combine the sugar cookie mix, softened butter, flour, and egg. Mix until a cohesive dough forms.
3. Divide the dough into portions and color each one with your desired gel food colors. Knead the dough gently to ensure the colors are evenly distributed.
4. Shape the dyed dough into egg shapes and place them on the ungreased baking sheets, leaving a bit of space between each cookie.
5. Bake the cookies for 8–10 minutes or until the edges are lightly golden. Keep a close eye on them to prevent over-baking.
6. Once baked, allow the cookies to cool on the baking sheets for 2 minutes before transferring them to wire racks to cool completely.
Notes
The secret to the best cookie texture is to not overmix the dough. Gently incorporate the ingredients until they just come together, avoiding excessive kneading or mixing.
Feel free to experiment with different food gel colors to create a wide range of Easter-inspired hues. Pastel shades, neon brights, and even marbled effects can all add to the festive appeal.
Be mindful not to overbake the cookies, as they can quickly go from perfectly soft to hard and crisp. Additionally, make sure to let the cookies cool completely before handling or decorating them to prevent crumbling.
While the classic sugar cookie base is delightful, you can also try adding a touch of lemon or almond extract to the dough for a different flavor profile.
Nutrition
- Serving Size: 1 cookie
- Calories: 120
- Sugar: 8g
- Sodium: 50mg
- Fat: 5g
- Saturated Fat: 3g
- Unsaturated Fat: 2g
- Trans Fat: 0g
- Carbohydrates: 18g
- Fiber: 0g
- Protein: 1g
- Cholesterol: 20mg
Keywords: Easter, Cookies, Baking