Malasadas, the beloved Portuguese-inspired pastry, have become a beloved staple in Hawaiian cuisine. These pillowy-soft, deep-fried doughnuts are a true delight for the senses, with their golden-brown exteriors and fluffy interiors. Whether you’re a longtime fan or new to the world of malasadas, this guide will take you on a delicious journey to master the art of making these irresistible treats at home.
Table of Contents
What Are Malasadas?
Malasadas are a type of Portuguese doughnut that has become a beloved part of Hawaiian culture. Originating from the Azores islands, these indulgent pastries were brought to the Hawaiian Islands by Portuguese immigrants in the late 19th century. Today, malasadas are a staple at local bakeries, celebrations, and even food trucks, with each bite offering a taste of Hawaiian tradition.
Ingredients
To create these delectable malasadas at home, you’ll need a few key ingredients:
- Whole Milk – Provides richness and tenderness to the dough.
- Active Dry Yeast – Helps the dough rise and develop a light, airy texture.
- Sugar – Adds sweetness and balances the flavors.
- Eggs – Contributes to the dough’s structure and richness.
- Butter – Adds flavor and a tender crumb.
- Salt – Enhances the overall flavor profile.
- Flour – The foundation of the dough.
- Oil for Frying – Ensures the malasadas achieve their signature crispy exterior.
- Granulated Sugar – For coating the warm malasadas.
For the optional Haupia Filling, you’ll also need:
- Unsweetened Coconut Milk – Provides a creamy, tropical flavor.
- Whole Milk – Balances the richness of the coconut milk.
- Egg Yolks – Thickens the filling and adds a velvety texture.
- Sugar – Sweetens the filling.
- Cornstarch – Helps the filling set and achieve a custard-like consistency.
- Salt – Enhances the flavors.
- Vanilla Extract – Adds depth and aroma.
- Coconut Extract – Intensifies the coconut flavor.
Step-by-Step
Activating the Yeast
Start by warming the whole milk until it’s lukewarm. Stir in the yeast and 1 tablespoon of sugar, then let the mixture sit for 5-10 minutes until it becomes foamy. This activates the yeast, preparing it to work its magic in the dough.
Mixing the Dough
In a large bowl, whisk together the eggs, remaining sugar, softened butter, and salt. Add the yeast mixture and gradually mix in the flour until a soft dough forms.
Kneading and Rising
Knead the dough for 5-7 minutes until it becomes smooth and elastic. Place the dough in a greased bowl, cover, and let it rise for about 1 hour, or until it has doubled in size.
Shaping the Malasadas
Once the dough has risen, roll it out to a 1/2-inch thickness and use a round cutter to shape the malasadas. Place the dough rounds on parchment-lined trays, cover, and let them rise for an additional 30 minutes.</
Frying the Malasadas
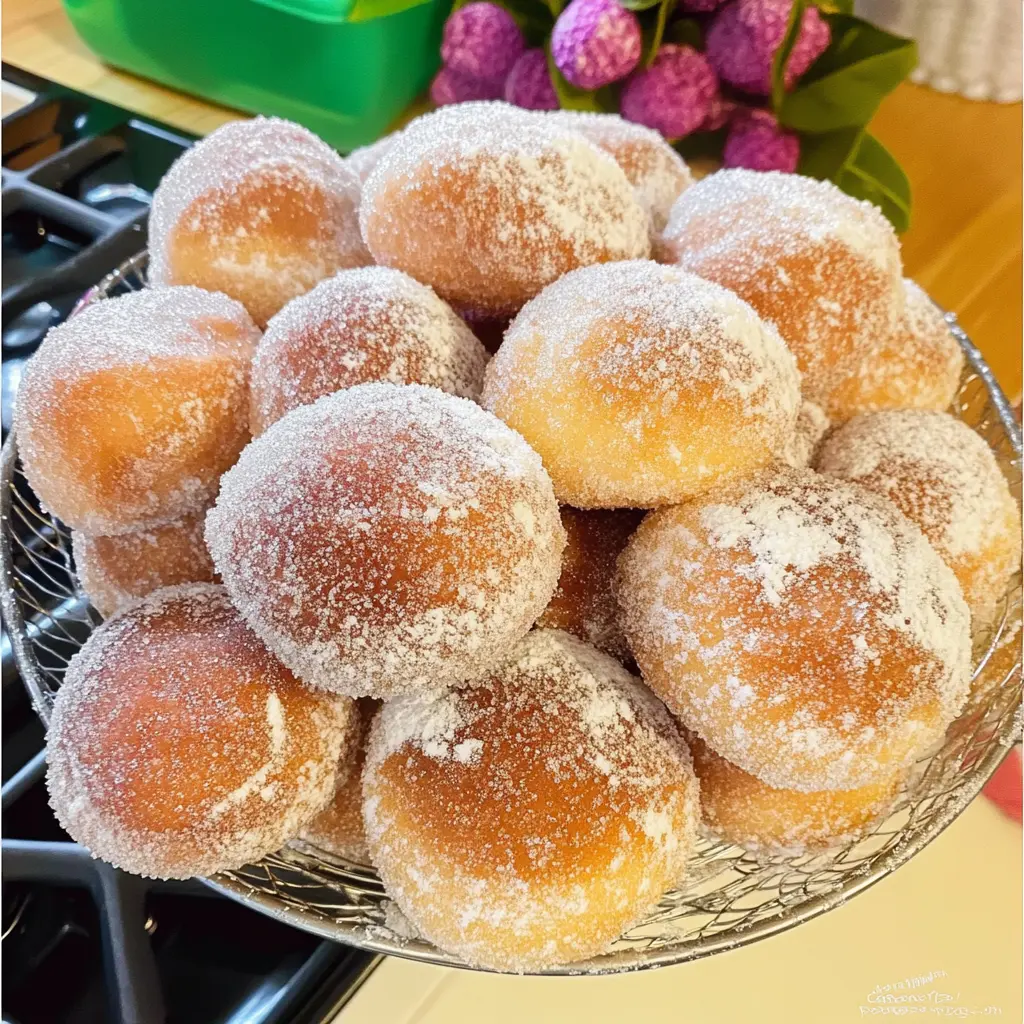
Heat oil in a large pot or Dutch oven to 350°F (175°C). Fry the malasadas in batches for 2-3 minutes per side, or until they’re golden brown. Drain the fried malasadas on paper towels.
Coating the Malasadas
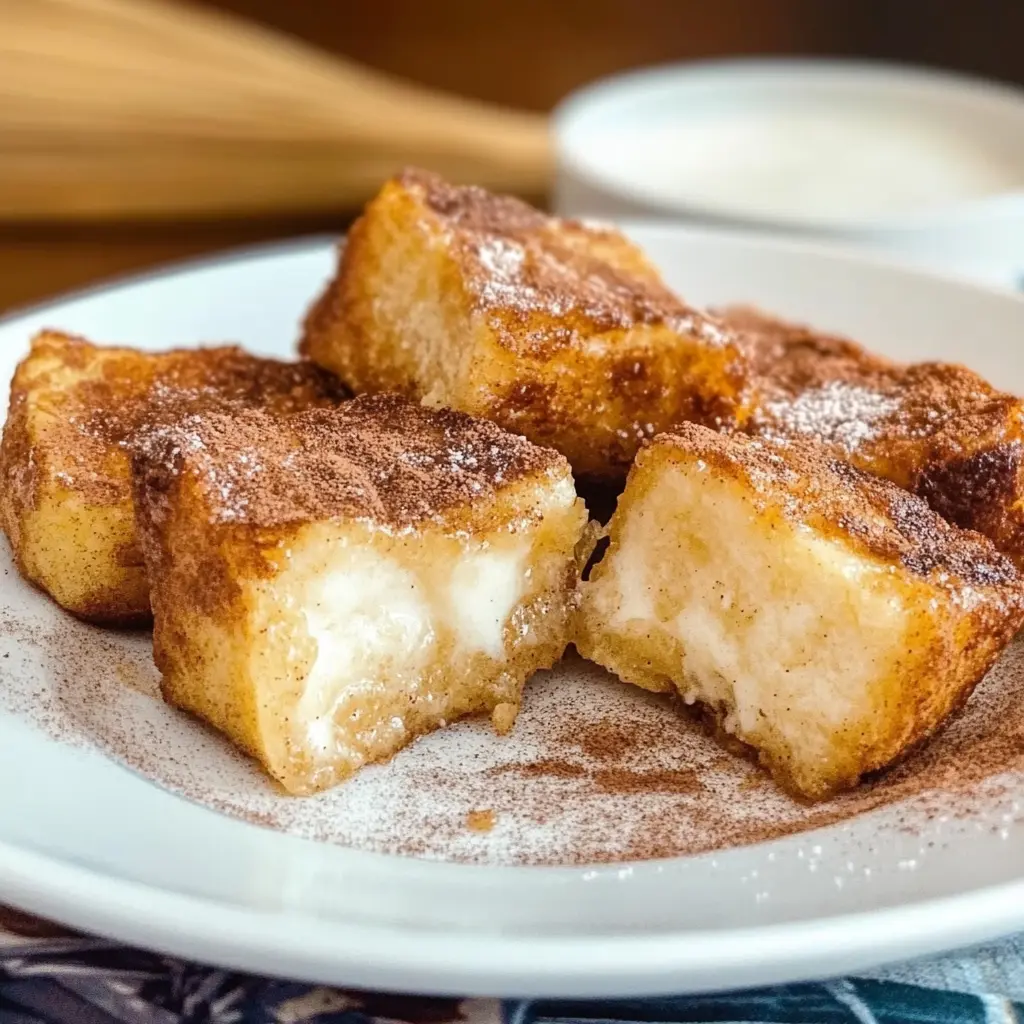
While the malasadas are still warm, roll them in granulated sugar to coat the exterior. This creates a delightful crunchy-meets-soft texture.
Preparing the Haupia Filling
For the optional Haupia Filling, whisk together the coconut milk, whole milk, egg yolks, sugar, cornstarch, and salt in a saucepan. Cook over medium heat, stirring constantly, until the mixture thickens. Remove from heat and stir in the vanilla and coconut extracts. Allow the filling to cool completely.
Filling the Malasadas
Once the Haupia Filling is cooled, transfer it to a piping bag. Poke a hole in each malasada and pipe the filling into the center.
Tips for Perfect Malasadas
Here are some tips to ensure your malasadas turn out perfectly every time:
- Choose the Right Oil – Opt for a high-heat oil like vegetable, canola, or peanut oil for frying the malasadas.
- Test for Doneness – The malasadas are ready when they’re golden brown on both sides and the interior is cooked through.
- Avoid Common Mistakes – Overproofing the dough or overcrowding the oil can lead to dense, greasy malasadas.
- Store and Reheat Properly – Keep leftover malasadas in an airtight container at room temperature for up to 3 days. Reheat in a 350°F oven for 5-7 minutes to restore the crispy exterior.
Variations
While the classic malasadas are a delight, there are many ways to put a unique spin on this Hawaiian treat:
- Chocolate-Filled Malasadas – Fill the malasadas with a rich chocolate ganache or creamy chocolate pudding.
- Fruit-Infused Malasadas – Try incorporating flavors like lemon, raspberry, or even tropical fruits like pineapple or guava.
- Savory Malasadas – Experiment with savory fillings like cheese, ham, or even pulled pork for a unique twist on the traditional dessert.
- Gluten-Free Malasadas – Use a gluten-free flour blend to make these pastries accessible to those with dietary restrictions.
More Related Recipes You Might Enjoy
Frequently Asked Questions
What are malasadas made of?
Malasadas are made from a rich, yeast-based dough that includes ingredients like whole milk, sugar, eggs, butter, and flour. The dough is deep-fried until golden brown, then coated in granulated sugar for a delightful crunch.
Do malasadas need to be filled with cream or jam?
No, malasadas do not necessarily need to be filled. The classic malasada is simply a fried dough pastry, coated in sugar. However, many people enjoy adding a filling, such as a creamy Haupia (coconut) custard or fruit preserves, for an extra burst of flavor.
How are malasadas different from regular doughnuts?
Malasadas are distinct from regular doughnuts in a few key ways. They are made with a richer, yeast-based dough, resulting in a lighter, fluffier texture. Malasadas are also traditionally deep-fried, rather than baked, and coated in granulated sugar instead of glaze or frosting.
Can malasadas be made ahead of time?
Yes, malasadas can be made ahead of time. The dough can be prepared in advance and refrigerated for up to 3 days before frying. Alternatively, the fried can be stored in an airtight container at room temperature for up to 3 days. Just be sure to reheat them in the oven to restore the crisp exterior before serving.
Indulge in the Delightful World
Malasadas are a beloved Hawaiian treat that transport you to the tropical islands with every bite. With their irresistible combination of fluffy dough, crispy exteriors, and optional creamy fillings, these pastries are sure to delight your senses and become a new favorite in your home. So gather your ingredients, fire up the fryer, and get ready to enjoy the mouthwatering magic of homemade malasadas!
Looking for more tasty ideas? Visit Elena’s Fast & Flavorful Recipes on Pinterest for a treasure trove of easy meals, comforting bakes, and fun kitchen inspiration!
PrintMake Irresistible Malasadas at Home with Haupia Filling

Mouthwatering Malasadas: Discover the Magic of This Hawaiian Treat
- Prep Time: 30 minutes
- Cook Time: 30 minutes
- Total Time: 1 hour
- Yield: 12 malasadas 1x
- Category: Dessert
- Method: Frying
- Cuisine: Hawaiian
- Diet: Vegetarian
Ingredients
- 1 cup whole milk
- 2 1/4 teaspoon active dry yeast
- 1/4 cup sugar
- 2 large eggs
- 1/4 cup butter, softened
- 1 teaspoon salt
- 4 cup all-purpose flour
- Oil for frying
- 1 cup granulated sugar for coating
- 1 cup unsweetened coconut milk (optional)
- 1/2 cup whole milk (optional)
- 3 large egg yolks (optional)
- 1/4 cup sugar (optional)
- 2 tablespoon cornstarch (optional)
- 1/4 teaspoon salt (optional)
- 1 teaspoon vanilla extract (optional)
- 1 teaspoon coconut extract (optional)
Instructions
1. 1. Start by warming the whole milk until it’s lukewarm. Stir in the yeast and 1 tablespoon of sugar, then let the mixture sit for 5-10 minutes until it becomes foamy.
2. 2. In a large bowl, whisk together the eggs, remaining sugar, softened butter, and salt. Add the yeast mixture and gradually mix in the flour until a soft dough forms.
3. 3. Knead the dough for 5-7 minutes until it becomes smooth and elastic. Place the dough in a greased bowl, cover, and let it rise for about 1 hour, or until it has doubled in size.
4. 4. Once the dough has risen, roll it out to a 1/2-inch thickness and use a round cutter to shape the malasadas. Place the dough rounds on parchment-lined trays, cover, and let them rise for an additional 30 minutes.
5. 5. Heat oil in a large pot or Dutch oven to 350°F. Fry the malasadas in batches for 2-3 minutes per side, or until they’re golden brown. Drain the fried malasadas on paper towels.
6. 6. While the malasadas are still warm, roll them in granulated sugar to coat the exterior.
7. 7. For the optional Haupia Filling, whisk together the coconut milk, whole milk, egg yolks, sugar, cornstarch, and salt in a saucepan. Cook over medium heat, stirring constantly, until the mixture thickens. Remove from heat and stir in the vanilla and coconut extracts. Allow the filling to cool completely.
8. 8. Once the Haupia Filling is cooled, transfer it to a piping bag. Poke a hole in each malasada and pipe the filling into the center.
Notes
Choose the Right Oil – Opt for a high-heat oil like vegetable, canola, or peanut oil for frying the malasadas.
Test for Doneness – The malasadas are ready when they’re golden brown on both sides and the interior is cooked through.
Avoid Common Mistakes – Overproofing the dough or overcrowding the oil can lead to dense, greasy malasadas.
Store and Reheat Properly – Keep leftover malasadas in an airtight container at room temperature for up to 3 days. Reheat in a 350°F oven for 5-7 minutes to restore the crispy exterior.
Nutrition
- Serving Size: 1 malasada
- Calories: 200
- Sugar: 10g
- Sodium: 150mg
- Fat: 8g
- Saturated Fat: 5g
- Unsaturated Fat: 2g
- Trans Fat: 0g
- Carbohydrates: 25g
- Fiber: 1g
- Protein: 3g
- Cholesterol: 40mg
Keywords: malasadas, dessert, Hawaiian treat